
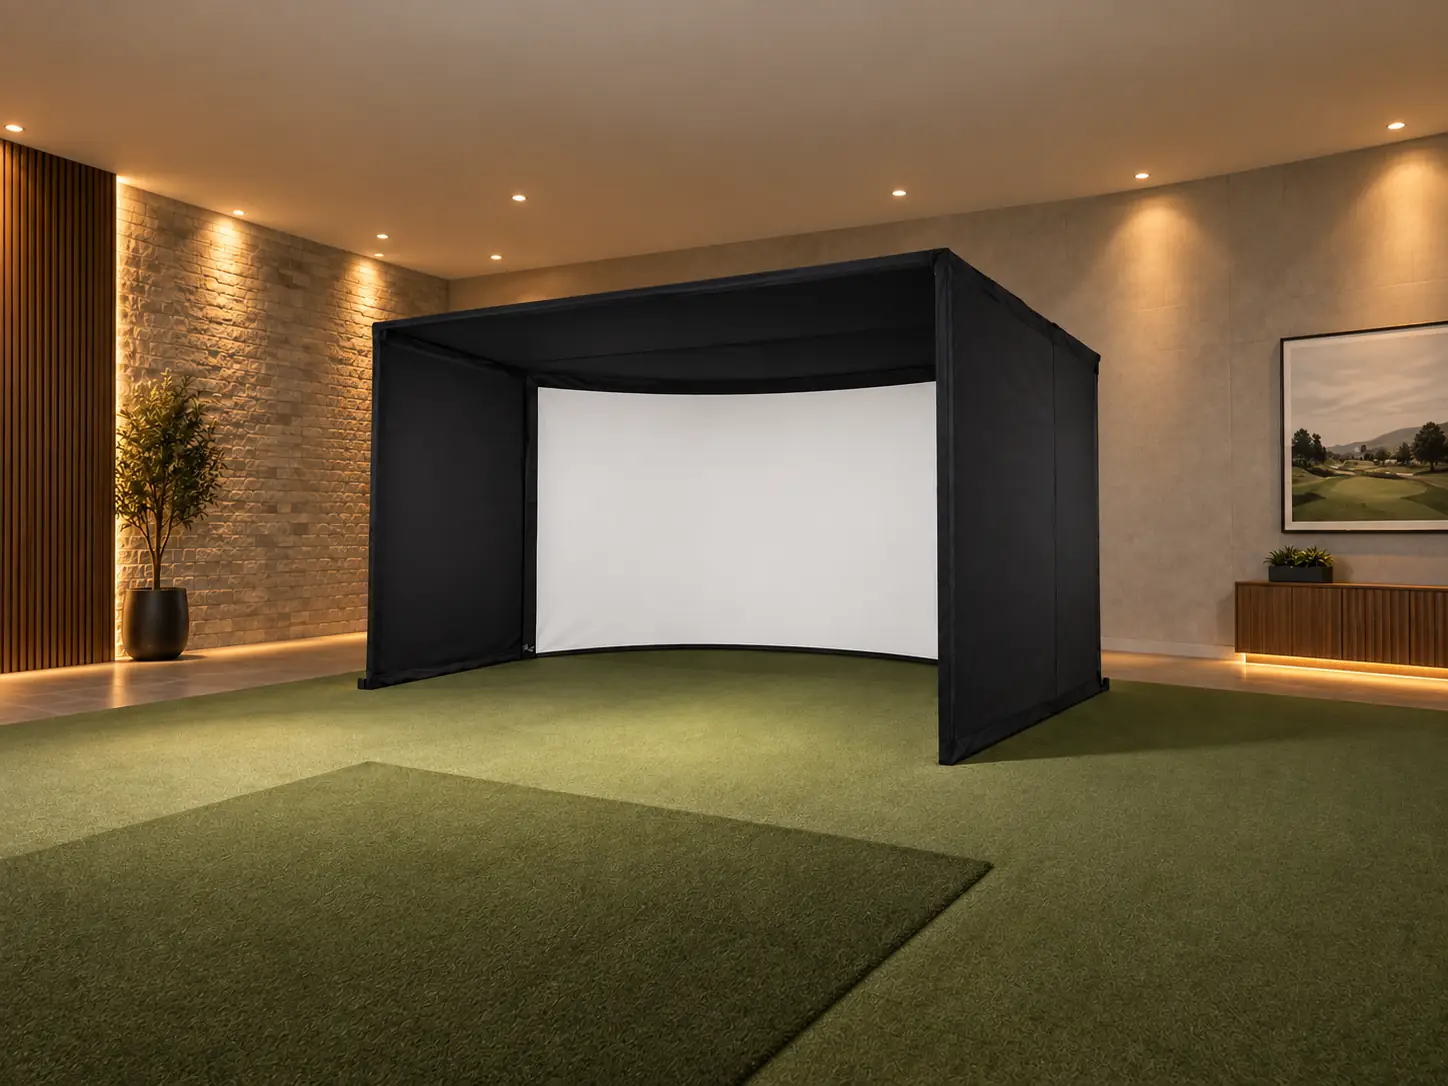
Carl’s Place’s Curved Golf Simulator Enclosure Kit with Impact Screen is a premium option for someone who wants the golf image to wrap farther around the playing position.
I would consider it for a spacious, dedicated room where the picture is a major part of the experience. I wouldn’t choose it merely to make an ordinary practice bay more expensive.
The real purchase is a coordinated screen and projection setup. The enclosure gives you the curved surface, but the projector, image correction, and installation still need to work together.
If that extra planning sounds like an unwelcome distraction from practicing golf, a flat screen deserves serious consideration.
What Are You Buying With the Curve?
The curve changes how the projected scene surrounds the viewer. Its purpose is a more enveloping picture, rather than an improvement to the launch monitor’s measurements.
I think that distinction helps put the price in perspective. A golfer who mostly studies shot data may value the room differently from someone who plays full rounds with friends.
I’d judge the effect from the proposed hitting position, not from a wide-angle photograph of the room. Ask for a demonstration with a layout reasonably close to yours.
Also look at the screen from where other players will wait. Their view may matter in a social room, even though the golfer remains the main reference point.
A dramatic installation photograph is a starting point for inspiration. It doesn’t tell you whether your available width and viewing position make the extra construction worthwhile.
The Base Kit Still Needs Its Pipes
Carl’s assembly guide identifies the frame pipes as a separate purchase. The curved kit uses 2-inch EMT, with a precut pipe kit available or the option to source and cut the specified tubing yourself.
The kit includes the chosen screen, steel fittings, Blackstop fabric, attachment hardware, and foam inserts. Premium white and High-Contrast Gray are screen choices; the back cover and ceiling baffles are optional accessories.
I’d lean toward a supplied pipe kit if arranging large tubing locally would complicate the project. A capable builder with suitable transport and tools may prefer to source it.
Either way, decide early. You don’t want the fabric and fittings sitting in the room while you discover that the remaining materials need another delivery arrangement.
The word DIY means the kit can be assembled by its buyer. It doesn’t mean the curved enclosure has the same parts or construction process as Carl’s separate DIY enclosure range.
Draw the Curve Into the Room Plan
A curved enclosure needs a plan showing its actual outline, not just a straight line representing the screen.
The standard 9-by-14 specification illustrates why the measurements matter. Its outer frame is 166 inches wide, the projection plane is 160 inches wide, and the screen measures 198.9 inches along its curve. These are three different widths for the same enclosure.
Use the outer width to judge room fit. Give the projector designer both the curved surface dimensions and the projection-plane measurement. Treating the longer fabric measurement as a flat screen width would start the design with the wrong geometry.
Carl’s size guide recommends a 12-inch rear buffer and identifies 9.5 inches as the minimum for its fittings. Keep that allowance on the configuration-specific drawing rather than placing the nominal enclosure depth flush against the wall.
This is also the time to choose where the computer will live and how the room will be serviced. A large screen shouldn’t leave the only access to important connections behind fabric that must be removed every time.
Can Your Projector Correct the Image?
The projection plan needs to account for the curved surface. Carl’s guidance discusses image warping, which digitally adjusts picture geometry, and warns that curved projection can involve focus and resolution compromises.
I would ask for confirmation using the exact projector model and enclosure configuration. A general short-throw label isn’t enough to settle the design.
Have the supplier explain where the lens will sit and how image correction will be handled. If external software is part of the answer, include its compatibility, cost, and setup in the proposal.
I’d want to see a grid and small text across the finished image, as well as a golf course scene. Attractive scenery can make a distracting edge or soft corner less obvious during a quick demonstration.
Keep the decision practical. You’re paying for a picture you’ll look at for long sessions, so accept the compromises deliberately rather than discovering them after the frame is built.
Multiple Projectors Mean More Setup Work
A larger curved screen may lead to a multiple-projector design, with overlapping images combined through edge blending. That is a different installation commitment from positioning a single projector.
Carl’s projection guidance discusses this approach as a way to address the demands of larger curves. It isn’t a requirement for every curved enclosure.
For a proposed blended installation, I’d establish who will configure the picture and who can restore it if settings change. Ask whether the installer will save the working configuration and leave clear operating instructions.
For a blended picture, judge the overlap during bright and dark scenes. Then ask the installer to save the accepted settings so an accidental display change doesn’t require rebuilding the arrangement from memory.
Hanging the Screen Takes a Specific Method
Carl’s manual hangs the screen from a top cable and uses bottom straps of different lengths, working outward from the center. Follow that sequence; the shape isn’t created by pulling a flat screen tighter at its corners.
The manual warns against overtightening the zip ties while hanging it. I would keep the instructions beside the frame and check orientation before progressing through the attachments.
I’d check that the bottom straps follow their assigned positions before making final adjustments. Their different lengths are part of the intended curve, so an attachment that looks interchangeable may not be.
If you’re paying for installation, distinguish frame assembly from projection calibration in the quote. Completing the mechanical work doesn’t establish that the picture is ready.
Price the Room Beyond the Advertised Starting Point
Carl’s enclosure collection listed the curved kit from $4,894.95 on September 29, 2026. That is a starting listing, not a quote for a selected size with pipes, electronics, and installation.
Ask for a configuration-specific total before comparing it with a flat-screen alternative. Include frame materials, mounts, projection hardware, any correction software, flooring, and delivery.
I’d also ask what happens if the first proposed projector arrangement doesn’t produce an acceptable image. Resolve responsibility for design and adjustment before paying for separate components from different suppliers.
I’d cost the projection design before committing to the enclosure. A curved-screen budget built around reusing an unsuitable projector can leave the central part of the experience unfunded.
Ask for a Demonstration You Can Evaluate
A useful demonstration should let you inspect the installation as a golfer and as the person who will operate it.
Before accepting a proposed setup, I’d check:
- Picture shape and legibility at the center and toward the screen edges.
- Clearance around the hitting position and the mounted equipment.
- The normal startup process using the intended golf software.
- Access for screen adjustment and routine equipment maintenance.
Use the room lighting you expect during play. If friends will sit behind the golfer with lights on, include that situation rather than evaluating only a dark, empty bay.
Discuss anything you find distracting while changes are still affordable. It is easier to revise a proposal than to relocate equipment after flooring and cabling are finished.
Would I Spend More for a Curved Enclosure?
I would spend more when the room is large enough to make the wraparound picture meaningful and the complete projection plan has been demonstrated convincingly.
The kit is appealing for someone who cares about the visual experience and wants a purpose-designed route to a curved installation.
For a golfer building mainly for efficient practice, I’d first price a well-executed flat-screen room. Put both proposals beside the same priorities and look at what the curved option actually adds.
My preference would be a simpler room that works comfortably over a complicated one with unresolved image problems. Choose Carl’s curved enclosure when the design, picture, and budget all support the extra ambition. The curve should earn its place every time you play.
What did you think?
Tap a reaction — no need to write anything.
Thanks for letting us know!
Interested in this?
Leave your details and tell us which applies.

Comments are closed.